The BW Optik 4" f6 Refractor Kit
By Clayton Kessler
Due to my interest in astrophotography I have looked for telephoto camera lenses for some time. Once you get above 200mm or so focal length they become rare and expensive. On the other hand – a few of my observing friends, and many people that are members of the Astrophoto Mailing List (APML), get wonderful shots through short focus refractors. These range from the 70mm Pronto up to 6 and 7" AP’s or Takahashi’s. Well, these scopes are somewhat out of my league, but I began to look around and see what I could afford.
The first thing that I tried was an Orion "Short Tube 80". This neat little scope of 400mm focal length worked – but problems presented themselves. The biggest problem was field curvature. Stars were stretched in several directions on my shots. Not being an optical expert, I do not know how to correct this – if it can be corrected. I looked through a TeleView 85 at the Texas Star Party and it is a wonderful scope both visually and photographically. The $2,000.00 price tag was kind of a shocker though. I kept coming back to an ad on Bill Burnett’s Internet Telescope Exchange. ITE is one of the companies that sells the Russian Maksutov telescopes that are becoming more popular all the time. Bill is advertising a 100mm (4") f6 "Semi-APO" refractor kit with a triplet objective from BW Optik in Germany. The optical test report and the user comments looked good, so did the price at $750.00 delivered. After reading the ad maybe a thousand times I ordered one.
Delivering The Goods -
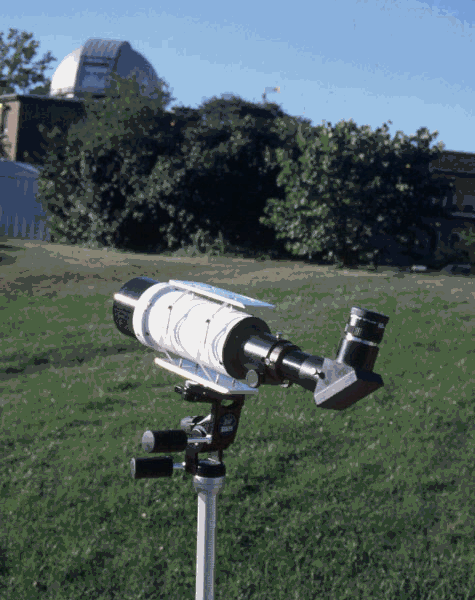
It took a little while to get, apparently the unrest in Eastern Europe added to the time involved in getting objectives from Germany, but it finally arrived. It was a happy day when the UPS driver dropped off the long awaited refractor kit. I was able to tear into the boxes and fondle all the bits and pieces for this "antique" telescope (sorry, inside joke J ). I was pleasantly surprised by the quality of the components that were supplied. The "Fiber" tube turned out to be a high quality and nice looking piece of phenolic tubing. It was very round and straight and perfectly suitable for a telescope tube. The focuser was the same one that is used on the Russian Mak’s and is a nice piece of work for visual use. The ads for the scope warn that the supplied focuser may not be "stiff" enough for photographic use, and that is the case, but it works very well visually. The objective came mounted in a cell and is a heck of a chunk of glass. The objective cell has a cam ring designed in to aid in optical alignment of the telescope. The kit included a 2" extension tube, which allows you to use different eyepieces / cameras and still come to focus. A multi purpose mounting rail was included that has a dovetail and several ¼-20 and 3/8-16 tripod screw holes. The "finder scope" supplied was actually a 4X40 rifle scope and rings. While I elected not to use this, I do not see why it will not be effective.
Getting It Together -
Complete assembly instructions, and a detailed blue print, came with the kit. I was especially thankful for the blue print as it helped me to visualize how everything worked. In the "Additional Notes to Advanced ATMers" section there are several suggestions that will make for a "Superior End Product". One of these was to replace the fiber tube with an aluminum one. Because I did not know just what the fiber tube was like, I had already acquired a piece of aluminum pipe to make a new tube. After seeing the fiber tube I would probably use it next time. I also made a push/pull adjustment adapter for the objective lens cell. In theory this will allow me to adjust the objective to be in very precise alignment and give the best star images.
Large pieces of glass seem to suck in dust from everywhere, so a lens cap and a dew shield were also made for this telescope.
First Light –
Of course, I could not wait until everything was done to look through the telescope. As soon as the metal work was done I screwed the unpainted parts together and walked outside. A 50mm eyepiece gave me 12x with this system and I was able to hand hold the tube steady enough to find the moon. The bright blob in the eyepiece snapped into crisp focus and the moon looked great! This is without any optical alignment – a very good sign. The next morning I took a look at Jupiter and Saturn. I could see moons and bands on Jupiter at this low power but my hand holding was too unsteady to make any quality judgements.
Finishing Touches –
The aluminum parts were cleaned and then primed with a zinc oxide primer. All of the inside surfaces were painted with Krylon Ultra Flat Black. The visible outside was painted with a white epoxy appliance paint. Unfortunately, aluminum is difficult to paint with a durable finish. The first trip home scratched the tube and I was quite disappointed. The solution, at least for now, was to get some white self-adhesive vinyl and wrap a layer around the tube. I will see how this holds up to the rigors of the observing field. The dew shield and lens cap need to be black anodized. This will wait until a larger quantity of aluminum is acquired that must be anodized – the minimum charge is expensive. Rings and dovetail plates were made to attach to my G11 mount. The dovetail plates are aluminum and the rings are lexan. The general arrangement is similar to what I have seen on some Astro Physics telescopes.
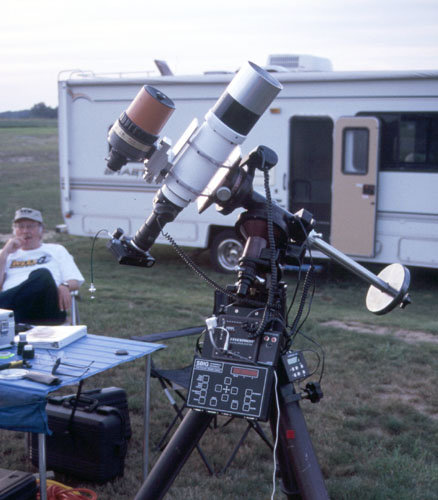
In order to make to easier to take astrophotos with this system I made an adapter to attach my JMI SCT rear cell MotoFocus. This is a very nice precision focuser and will support the weight of a camera without moving around. The JMI unit has considerably less focus range – but for photography it will be fine.
Star Testing and Optical Alignment –
Now I have no idea how to align an refractor. The instructions mention rotating the cam ring on the cell to get a round star image both in focus and out of focus. No mention was made of how to use the push / pull cell to align the objective. Fortunately, Greg Burnett loaned me a copy of "The Adjustment and Testing of Telescope Objectives" by H. Dennis Taylor. This is an interesting and complete volume in about 110 pages. The first edition date is 1891! (Man – I feel younger all the time). The copy Greg loaned me was the 5th Edition dated 1983. Using this as a guide "Squaring Up" the objective should be simple.
The first "Star Test" was done at Harry Kindt’s retirement place in northern Ohio. Naturally, because we were trying to do astronomy, it was pretty cloudy. I did get a chance to evaluate the optics against the illustrations in Greg’s book. I don’t know what I expected to see, all of my experience has been with SCT’s and Newtonians. What I saw, inside and outside of focus, was a beautiful "bullseye" pattern of diffraction rings. There was some slight "off center-ness" to the pattern but it was quite smooth and very close to round. The adjustments that I can make to the objective should allow this to be adjusted out completely. After fumbling around in the dark I can see why an "artificial star" is so handy for optical testing. I am going to order an optical spanner from Edmund Scientific and research the "ball bearing" artificial star method before I attempt any adjustments.
Through The Eyepiece –
I can sum up the viewing in one word – "WOW"! Spectacular vistas of stars with a 50mm eyepiece (12X) and the same with an 18mm (33X). I have to get used to the scale of things. M57 was very small and easy to overlook in the 50, it was much easier to see in the 18. M27 was easy in both eyepieces and quite distinct. It was a joy to loosen the clutches and sweep around just gazing at "interesting stuff". To give an idea of the field of view, Broncchi’s cluster – more familiar as the "Coathanger" easily fit in the view-field of the 50mm eyepiece with room to spare. I am hoping that SMURFS will present a chance to better evaluate these optics.
Astrophotography –
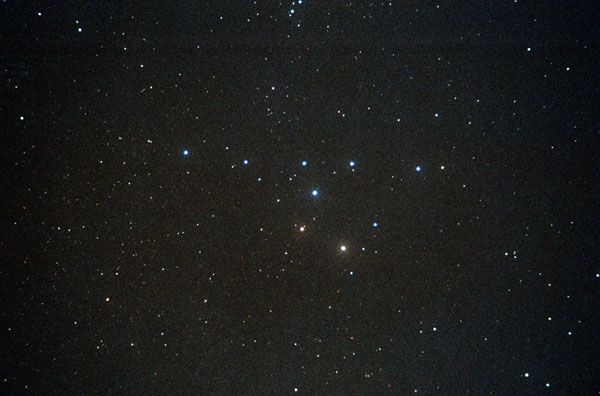
I must admit, I ruined the viewing for everyone at Harry’s. I did this by setting up a camera. I no sooner got the ST4 guiding and the exposure started then the clouds filled the last hole overhead. I walked away for five minutes or so and when I returned the ST4 was beeping and the clouds had just about choked off any further star-gazing. I terminated the exposure thinking that 5 minutes or so would not get me anything. Imagine my surprise when I had the film processed and a nice shot of the coathanger cluster emerged. It is underexposed, but I got quite a bit on the negative. If we get any clear weather at SMURFS I expect to give this thing a real workout!
Conclusions –
I think that the BW Optik 4" f6 Refractor is a wonderful buy! The information on the ITE website was very accurate and well presented. Even the downside of the supplied focuser was discussed. I would recommend the kit to everyone who wants to try a high quality refractor, is willing to add some "sweat equity" and doesn’t want to re-mortgage the house to pay for one. The only really difficult part of the assembly required is the accurate location of the drilled and tapped holes that you put in the tailpiece and lens cell. These must line up with the holes you drill in the tube. If you have access to a machine shop this is easy but if you are doing the holes by "hand" ‘I recommend you make a simple drill jig to assist in getting everything lined up.
What would I change? Well, the kit is actually fairly complete, a lot of the additions that I made were "just because". The biggest down side is the focuser. Bill Burnett offered to adapt a helical focuser for me at an additional cost. This might be a better solution for those that wish to do astrophotography with the scope. In an ideal world a high quality JMI type manual focuser with a 2.7" capacity, a 2" adapter and a specially designed field flattener would be wonderful! Are you listening Bill?